Friday, March 30, 2012

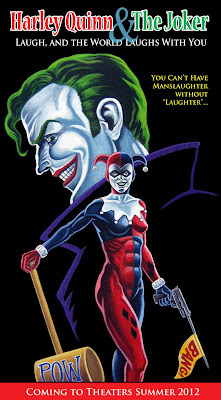
Harley Quinn & The Joker

This is my submission to the SuperPunch Blog, which I visit regularly.  They are having a contest to create a mock-up of a movie poster based on a DC character and win a DC Chess Set, so here it is.


Here's the process:

* * * * *


STEP ONE:  As usual, I used a mixture of gesso and size (glue) to prime a 10" x 15" Crescent Illustration Board (#215).  I then drew out the image with a blue pencil, as it seems to smear a little less when I'm working with it.  I didn't have a reference for Harley Quinn at the time I sketched it, so the head dress is a little off character.  I also didn't bother to use picture references for the painting, either, so I suppose that is fitting.  I also wasn't quite sure what I wanted to do with Harley Quinn's hand, so I left that sort of vague at that moment.

* * * * *


STEP TWO:  I did some black-and-white wash underpainting, trying to determine some vague modeling for the figure.  For complaining about the concept of underpainting in some previous posts, I sure seem to use it a lot.  Anyway, I then started laying some acrylic color over top the black-and-white washes.  Also, I didn't feel the Joker's eyes were quite "crazy" enough in the pencil drawing, so I tried to correct that a bit.  And I still wasn't sure what I wanted to do with Harley's other hand not holding the giant hammer.

* * * * *


STEP THREE:  Here's the finished painting.  When I took the picture, there was a bit of glare on large chunks of the background of the painting from the lighting (you can sort of see it in the previous picture in STEP TWO).  So, I decided to use the Dodge-and-Burn tool in PhotoShop to darken and burn-out highlights for the background, rather than just use the paintbrush to give it a single color.  That seemed to work.  And, I **FINALLY** decided to give Harley Quinn one of those guns with a "Bang!" flag in it.  It seemed in character.

* * * * *


STEP FOUR:  I added the lettering in PhotoShop for the faux poster and submitted it to SuperPunch.

* * * * *

Speaking of the SuperPunch Blog, I was in one of their Illustration Roundups for February 21, 2012 with my "Watchmen: The Squid" cover.  It was very surreal seeing my stuff on someone else's blog (with credit AND a link to my blog--that's especially nice).  Especially as it is a blog I read every week or so and I wasn't expecting it at all...  Cool!

- - - - - 

This was done with acrylic paint on 10" x 15" gessoed Crescent Illustration Board

Friday, March 16, 2012

ROM: Spaceknight #1: Page Recreation

ROM: Spaceknight #1, Page 1

Here is the original 


And here is my recreation of the page:


I have very fond memories of ROM: Spaceknight--a comic from my misspent youth in the early 1980's, so I wanted to do another ROM painting.  The "Arrival" scene was always one of my favorites.

For those who are interested, here is the usual process...

* * *


Step One:  First, I primed a 15" x 20" piece of #215 Crescent Board with a mixture of size (glue) and gesso.  Then, I measured off the 12" x 16" painting area, doing the panel lines in Sharpie.  For the series of three panels at top, I extended the panel lines outside the painting area, as I was pretty sure the panel lines would be painted over (I was right, and the panel edges were, indeed, painted over.)  :-)

I then used a blue-lead pencil to draw out the page. I used to do a lot of drawings with blue-line for pen-and-ink work and always liked it.  I recently found one of my blue pencils and decided to use it.

* * *


Step Two:  I begin by laying down some color with acrylic paints...

* * *


Step Three:  More painting...

* * *


Step Four:  I taped off the panel series at the top of the screen.  I painted the edges with some clear acrylic medium to keep the edge as sharp as possible and to prevent paint from bleeding under it.  For the space nebula effect, I used a spray bottle of water and white paint and built up several layers of wet-on-wet paint.  When it was dried, I went over top of it with some watered down blue paint to color it.  Lastly, I took some black paint and reworked some of the edges.

Also, I wasn't paying attention and somehow got it in my head that the second panel was showing ROM entering the Earth's atmosphere, but after I read the caption again, I realized it should be much closer to the ground.  Of course, I didn't realize this until I was finished painting the panel with Earth from space (including clouds and everything) and had to redo the whole thing.  Sigh...

* * *


Step Five:  Finished painting!  I repainted the second panel, finished up some of the fire effects (well, some of them could be better, IMHO), and pushed some of the shadows and highlights.

* * *


Step Six:  I added lettering in PhotoShop and called it DONE!  I also sent a copy of the last panel on to Anthony with the Re-Paneled Blog.

* * *

This was painted with Acrylic on 12" x 16" sized and gessoed #215 Crescent Board

.

Thursday, March 8, 2012

On the Easel - March 8, 2012 - Rom: Spaceknight

On the Easel - Rom: Spaceknight Page Recreation

Greetings!  I just got back from a bit of an extended vacation, so I'm still trying to catch up on all sorts of other, random stuff.  So, this posting is a bit of a cheat, but here's what's on the easel at the moment: a page recreation of Rom: Spaceknight #1, page 1


I may make this a semi-regular feature, if there is any interest.  First, it is pretty easy to just take a picture of a work-in-progress and post it, so it can allow me to post more often (albeit, it is somewhat inflated and a bit of a cheat, as mentioned above), but I am also curious what other people are working on.  I'm thinking particularly of Ashley Wood, who often posts picture of what he has on his easel at the moment. 

I'm hoping to have it finished next week and have the process posted.  So, we'll see how that goes... :-)

.