Thursday, February 4, 2016

Unwanted Valentines: Pan's Labyrinth

Unwanted Valentines:
Pan's Labyrinth


It's time again for those heart-shaped blights to your eyes, Unwanted Valentines!

In this case, it is based off The Pale Man from "Pan's Labyrinth".

* * *


STEP ONE:  Here are the digital pencils.  I just did a really quick, loose digital drawing.

* * *


STEP TWO:  And the digital inks done mostly with a 5 point Hard Round brush.

* * *


STEP THREE:  And here is the colored image.  I then added lettering, above, and called it DONE!

* * *

This was done with Photoshop.

.

Wednesday, January 27, 2016

OMAC (One Man Army Corps)

O.M.A.C. (One Man Army Corps)


I know I've spoken before about my extreme fondness for the Kirby created, Mohawk-wearing warrior of tomorrow, O.M.A.C. (One Man Army Corps), and even use the Charles M. Schultz mash-up of O.M.A.C. for my avatar both here and at work.  Originally, I was going to use O.M.A.C. for a New Year's picture, with the iris/pupil "O" in the eye on his chest being the "0" in 2016, but his expression seemed a little on the serious side, so I decided to move it to later in the month.  I'm sure I will be doing more with O.M.A.C. in the future.

However, there is something about my drawing of his Mohawk while looking at it straight on that sort of bothers me.  It reminds me of something... I can't quite put my finger on it.  Oh, wait, I think I know what it reminds me of...


OH, NO!  NOT THAT!  ANYTHING BUT THAT!

Sigh...  Oh, well.  For those interested, here are the steps in drawing.  

(NOTE: While I really like "Fifth Element", Chris Tucker's character, DJ Ruby Rhod, is SUPER annoying.)

* * *


STEP ONE:  Here are the digital pencils on a 1,000px by 1,400px canvas at 200dpi. 

* * *


STEP TWO:  Here is the grayscale laying out the general form, as well as some of the light and shadows.

* * *


STEP THREE:  I cut out the figure and did the background, and then did the flat colors over a MULTIPLY Layer.

* * *


STEP FOUR:  I added the final highlights and shadows over the flat colors, and painted over top of everything with several Normal Layers.

* * *

This was done with Photoshop.

.

Wednesday, January 20, 2016

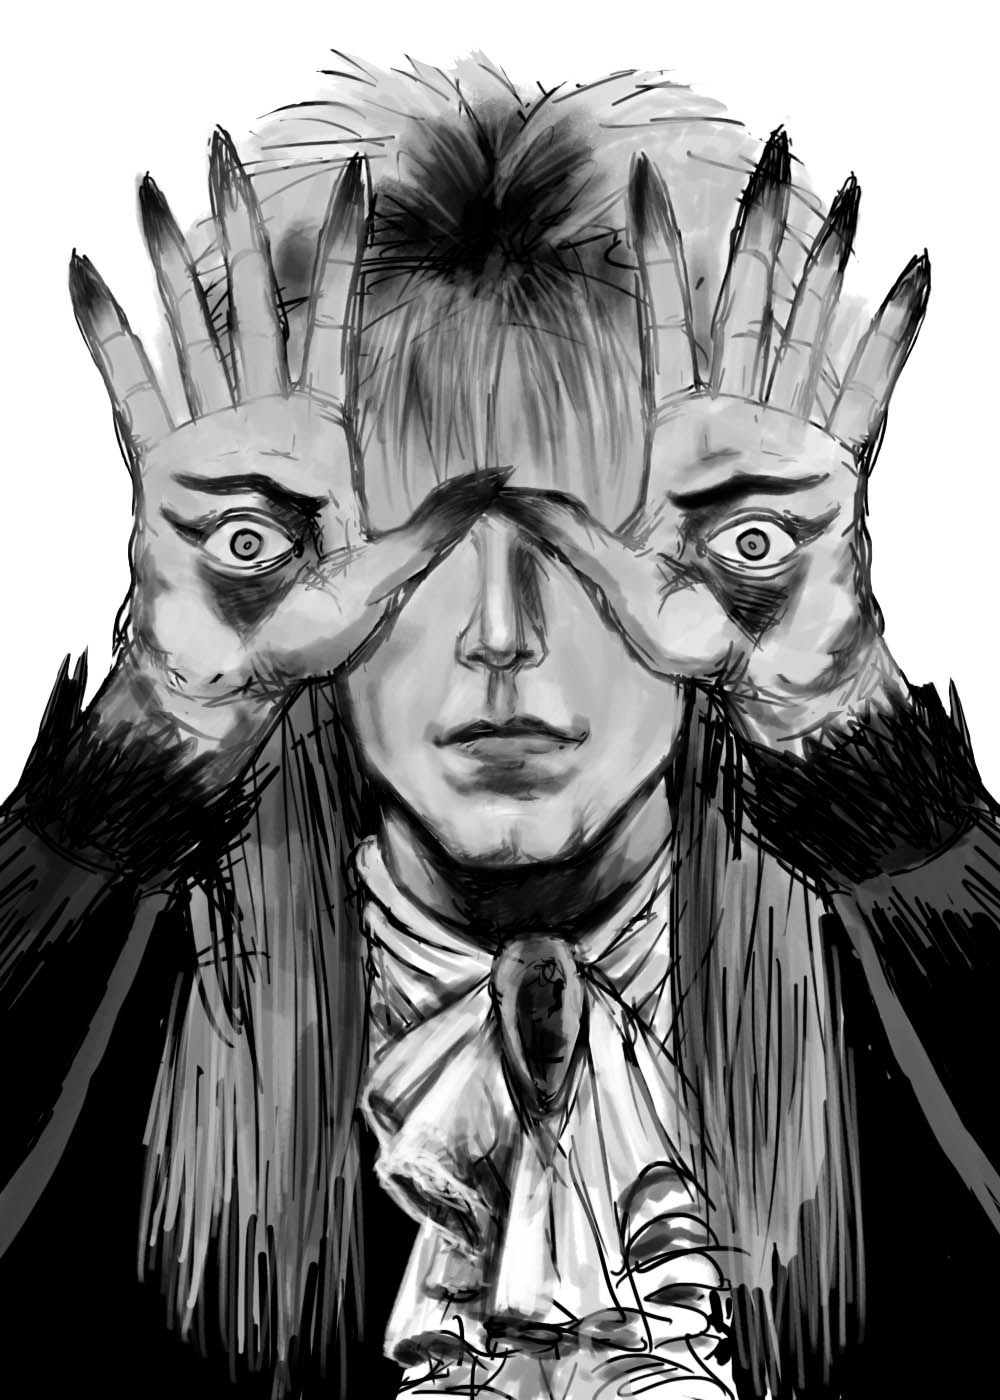
Pan's Labyrinth Starring David Bowie

Pan's Labyrinth Starring David Bowie


OK, this was an obvious mash-up of the Pale Man from "Pan's Labyrinth" and The Pale Duke, David Bowie, as Jareth from "Labyrinth".  I've had on my list of things to do for a while and given the recent news of Bowie's death, I figured I'd do it as a tribute.

I was a fan of his music, as well as acting.

* * *


STEP ONE: I did the digital pencils on a 1,000px x 1,400px canvas at 200dpi.

* * *


STEP TWO:  Next I laid down some rough values with a grayscale over-painting.  I really liked the sketchiness of the drawing at this point and almost left it at this stage and was tempted to just finish it as a black-and-white drawing.

* * *


STEP THREE:  After creating a MULTIPLY Layer, I laid down some flat coloring and decided to keep going with color.

* * *


STEP FOUR:  I created a bunch of NORMAL Layers--one for hands, one for the face, one of the hair, one for the clothes, etc. and added highlights and shadows to the flat color layer with a Oil Pastel brush in Photoshop.  And, yeah, I decided not to include Bowie's blown out pupil on his left eye (it looked--no pun intended--a little distracting).

* * *

This was done digitally in Photoshop.

.

Friday, January 8, 2016

A New Year, A New Hope...

HAPPY NEW YEAR - 2016!

A New Year, A New Hope...


Well, another year has come and gone with the usual mix of minor accomplishments and regrets.  I have made the usual retinue of resolutions to break for the New Year, and I'm sure y'all have done the same.  Here's to hoping all goes well for everyone!

I also want to take a few moments at the top of the new year to thank everyone for stopping by and gawking at my modest Blog, as well as the words of encouragement from many of you!  You are all much appreciated!  :-)

I have a stack of odd-sized, scrap pieces of hardboard which I gessoed.  From time-to-time, I'll grab one and paint a picture from a magazine that catches my eye, or something of the sort.  Nothing too fancy, just for warm-up or to try and work on some art skills for an hour or two.  Use it or lose it, don't ya know?  

In this case, it was a picture of Luke Skywalker from the original "Star Wars", which seemed like it would work on this Blog--I even thought of a semi-clever title and everything!  The painting was done with casein (it's sort of like acrylic paint, except it uses a milk-based protein as a binder) on a 4" x 5" gessoed hardboard, using a #10 Flat brush and #10 and #12 Round brushes. 

If I were smart (and I've never been accused of being such), I would have taken pictures/scans as I went along to show the progress, since many people like to see the process (I know I like seeing how they got from point "A" to point "B", myself).

If people like 'em enough, I may post more in the future.  We'll see, I guess.  :-)

* * *

Done with casein on 4" x 5" gessoed hardboard.

.

Wednesday, December 23, 2015

Merry Sithmas - Kylo Ren

MERRY SITHMAS!


Here's the final one in the set, featuring Kylo Ren (that's right, I can beat a joke into the ground with the best of 'em).  And, yes, I saw the movie on opening day... I would have lost all my precious, precious nerd cred if I hadn't, and they would have made me turn in my badge and secret decoder ring, no doubt.  :-)

I won't spoil anything other than to say if you like the Original Trilogy, you will probably like Star Wars: Episode VII: The Force Awakens.  (SPOILERS!  There is a new "Star Wars" movie out!)

* * *


STEP ONE:  Again, I used actual pencils on copy paper for the under drawing and extended the drawing (and holly) digitally.  I did a half-image, then duplicated and flipped it horizontally to save some time and to make sure it stayed symmetrical.  The image is 900px x 1260px.

* * *


STEP TWO:  The image was then inked digitally using a 5px brush for the most part.

* * *


STEP THREE:  I created a MULTIPLY Layer to colorize the drawing, and then added the lettering.  I also used the animated tab to create the animated, blinking stars in the .gif, above.

* * *

Done digitally in Photoshop.

.

Tuesday, December 22, 2015

Merry Sithmas - Darth Vader

MERRY SITHMAS


Hey, it's the third "Merry Sithmas", this time featuring Darth Vader.

* * *


STEP ONE:  This time I used actual pencils on copy paper for the under drawing, rather than just digital pencils (although, the Santa Hat was digitally added over top).  I did a half-image, then duplicated and flipped it horizontally.  The image is 900px x 1260px.

* * *


STEP TWO:  Here are the digital inks, done mostly with a 5px brush.

* * *


STEP THREE:  I created a MULTIPLY Layer to begin colorizing the drawing, and then added the lettering.  I also used the animated tab to create the animated .gif, above.

* * *

Done digitally with Photoshop.

.

Friday, December 18, 2015

Merry Sithmas - Darth Sidious

MERRY SITHMAS!


Here's the second in the "Merry Sithmas" series, featuring Darth Sidious.  I had just enough time to include the animated version with this post.  :-)

* * *


STEP ONE:  Here are the digital pencils, done on a canvas 900px x 1260px.

* * *


STEP TWO:  Here are the digital inks, done mostly with a 5px brush.

* * *


STEP THREE:  I created a MULTIPLY Layer to begin colorizing the drawing, and then added the lettering.  I also used the animated tab to create the animated .gif, above.

* * *

Done digitally with Photoshop.

.

Wednesday, December 16, 2015

Merry Sithmas - Darth Maul (Updated)

Merry Sithmas!


UPDATED: Oooohhhh, blinking lights!  :-)

.

Merry Sithmas - Darth Maul

MERRY SITHMAS!


I thought I was super-clever when I thought of "Merry Sithmas".  Well, as usual, it turns out most people are much quicker than yours truly, as it was already a thing, of sorts.  Ah, well... nonetheless, this image jumped in my head, just in time for the holidays (or, rather, "holi-daze" as I prefer to call them).  I have a series of these in mind--we'll see if I get 'em done in time!

* * *


STEP ONE:  Here are the digital pencils, done on a 900px x 1260px canvas.

* * *


STEP TWO: Since I knew the facial pattern would need to be identical on both sides, I inked half of Darth Maul's face, then copied and flipped it horizontally.  I also left off the horns, since I was going to be replacing them with Christmas Tree lights.

* * *


STEP THREE: I created a MULTIPLY Layer to begin colorizing the drawing, and then added the lettering.

* * *

Done digitally in Photoshop.

.

Saturday, October 31, 2015

Inktober! Halloween Round-Up

Inktober!

Well, I suppose it makes more sense to show whatever was done with the Halloween-based, Pen-and-Ink drawings for Inktober without the colorized layers on top.  So, here they all are in their inky, black-and-white gory... er, glory.

Happy Halloween!


* * *

All were done with pen-and-ink with a No. 8 brush on 8-1/2" x 11" cardstock.--although, the Mummy also used Copic .5mm marker, as well.

I almost forgot how much fun it is to work in straight up pen-and-ink.  I'm definitely gonna have to do this some more.  :-)

.

Friday, October 30, 2015

Wizard of Oz (1939)

Wizard of Oz (1939)


Well, for the last of the Halloween-based Inktober drawings, I figured I'd do a witch.  And, which witch is the most famous witch of all?  Elphaba, The Wicked Witch of the West, of course (OK, I read the book "Wicked: The Life and Times of the Wicked Witch of the West" by Gregory Maguire... I haven't seen the musical, yet). 

And, since it is "The Wizard of Oz", I guess the term "B-Movie" really doesn't apply all that much.  Oh, well.

* * *


STEP ONE:  Here are the rough pencils on a 8-1/2" x 11" sheet of cardstock.

* * *


STEP TWO:  I inked the pencils with a a #8 brush and Pro-Art 4100 India Ink.

* * *


STEP THREE:  I scanned the pen-and-ink drawing into Photoshop and colorized it over a MULTIPLY Layer.

* * *

Done with pen-and-ink on 8-1/2" x 11" cardstock, colorized in Photoshop.

.

Tuesday, October 20, 2015

Plan 9 from Outer Space (1959)

Plan 9 from Outer Space (1959)


This was a movie which I saw when I was six or seven.  Ah, my time as a youngster in Central Wisconsin in the mid-1970's, spent staying up waaaayyyy too late on Friday nights to watch "T.J. and the A.N.T." (All Night Theater).  They would show old B-Movies featuring "Godzilla", various monsters and space aliens, broken up with "The Andy Griffith Show", "Charlie Chan", and other shows they must have gotten dirt cheap for syndication.  But, as I was a kid, I didn't care.  I was there for the B-Movies.  Anything involving robots, spaceships, monsters, aliens, and their ilk, I was in.  (Sadly, I've probably watched 80% of the movies shown on Mystery Science Theater 3000 without Joel/Mike, Tom Servo, and Crow T. Robot in the corner.)

As for the Ed Wood, um... classic (?), "Plan 9 from Outer Space", to my young mind it was a terrifyingly realistic plot to take over the world using zombies!  Looking at it today, of course,  "Plan 9 from Outer Space" is a terrifyingly realistic plot to take over the world using zombies! 

I know I usually do the pen-and-ink, B-Movie Halloween series with some sort of monochromatic color scheme on these, but in this case I can only think of Tor Johnson in washed out black-and-white.  Colorizing him just seems... wrong.

And, now, the step-by-step for those interested...  And even those of you who aren't interested, of course.

* * *


STEP ONE:  Here are the rough pencils on a 8-1/2" x 11" sheet of cardstock.

* * *


STEP TWO:  I inked the pencils with a a #8 brush and Pro-Art 4100 India Ink.

* * *


STEP THREE:  I scanned the pen-and-ink drawing into Photoshop and did a grayscale over a MULTIPLY Layer.

* * *

Done with pen-and-ink on 8-1/2" x 11" cardstock, colorized in Photoshop.

.

Thursday, October 8, 2015

Creature from the Black Lagoon (1954)

Creature from the Black Lagoon (1954)


The Creature from the Black Lagoon, A.K.A. Gill-Man, was a creature I knew more about from pictures in various monster magazines and books then from the movie, itself.  It did eventually show up in one of the many Saturday Monster Matinees they would show on TV when I was growing up.  As I was a kid with a fixation and imagination bent toward anything with monsters, aliens, and robots, found it great, scary fun.  I haven't watched it recently, so I wonder how it holds up to a more modern viewing.

* * *


STEP ONE:  Here are the rough pencils on a 8-1/2" x 11" sheet of cardstock.

* * * 


STEP TWO:  I inked the pencils with a a #8 brush and Pro-Art 4100 India Ink. 

* * *


STEP THREE:  I scanned it into Photoshop and colorized the Creature with three values of green over a MULTIPLY Layer, but also added some more color to the lips, and blue background.  I added a couple simple bubbles just 'cuz it amused me.

* * *

Done with pen-and-ink on 8-1/2" x 11" cardstock, colorized in Photoshop.

.