Thursday, April 28, 2016

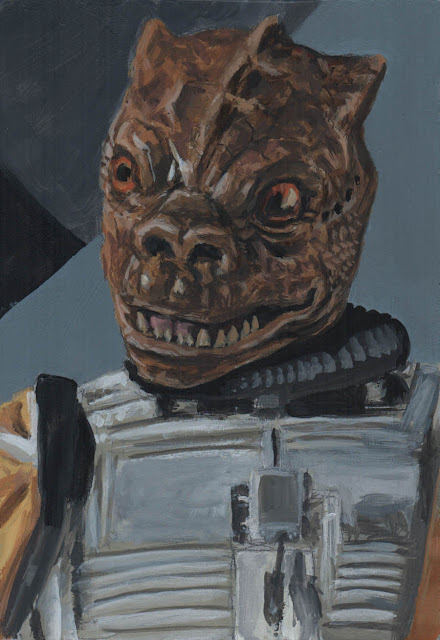
Mini-Paint: Bossk

Bossk


Who's that Trandoshan with a Wookie pelt on his belt?  Bossk!  You're damn right!  (Yes, the previous sentence was to be said to the tune of Isaac Hayes's "Shaft" song--lyrics don't start until about 2:40 into the video.) 

Anyways, I'm continuing on with the Bounty Hunters from "The Empire Strikes Back".

And, just for funzies, it's a video of Bossk in action on "Robot Chicken".  Y'know, just because.

The palette was: Titanium White, Naples Yellow (Red Lt.), Yellow Ochre, Burnt Umber, Cadmium Red Deep, Cobalt Blue (Hue), and Ivory Black.

Again, this one ran over time and was done in about 3 hours or so.

* * *


STEP ONE:  Here are the pencils on a 5-1/2" x 8" gray, gessoed hardboard.

* * *


STEP TWO:  The first half-hour was spent just laying in the general colors and getting some paint down on the gessoed surface to built upon.

* * *


STEP THREE:  I spent the next hour modelling the face and getting the mid-tones in and placement of highlights and shadows.

* * *


STEP FOUR:  I went long on this one, spending the next 90 minutes painting and re-painting his face, trying alternately to warm up the color of his face with more orange, and cool down other parts of the face with the darker browns.  I also finished up the suit he was wearing and figured I'd best call it good enough, lest I keep overworking it.

I have to keep reminding myself these are meant for warm-up/practice and, while I want them to look good enough to post, I don't need to have to be perfect, lest the time I spend on them spin completely outta control...  Which sorta defeats the purpose of these Mini-Paints.  :-S

* * *

This was done with acrylic paint on 5.5" x 8" gessoed hardboard.

.

Tuesday, April 26, 2016

Mini-Paint: Boba Fett

Boba Fett


This time around it's everyone's favorite Bounty Hunter, Boba Fett.  Sure, he was cool right up until he was essentially killed by Mr. Magoo (in this case, played by mostly blind Han Solo) in "Return of the Jedi".

I think I'll be doing the rest of the Bounty Hunters featured in "The Empire Strikes Back".

The palette was: Titanium White, Naples Yellow (Red Lt.), Yellow Ochre, Burnt Umber, Cadmium Red Deep, Cobalt Blue (Hue), and Ivory Black.

This was done in about 2 hours.

* * *


STEP ONE:  Here are the relatively quick pencils on 5-1/2" x 8" toned, gessoed hardboard.

* * *


STEP TWO:  Here is the first pass of acrylic paints after a half-hour with a #10 flat brush.  Once again, I decided to forego the green paint from the tube and accepted the challenge to mix my own from the limited palette. 

* * *


STEP THREE:  Continuing to work on tightening up the painting over the next 45 minutes, using a #10 flat brush and #10 round brush.  Mostly, it is building up the more of the shadows and light source.

* * *


STEP FOUR:  The last 45 minutes was spent adding more details, all the chipped paint on the armor, and getting everything finished up with the final highlights and shadows.

* * *

This was done with acrylic paint on 5.5" x 8" gessoed hardboard.

.

Friday, April 22, 2016

Mini-Paint: Jyn Erso

Jyn Erso


Well, this is another Mini-Paint which turned out to take a lot longer than I intended.  In this case, I choose Jyn Erso from the new "Rogue One" trailer.  There were lots of great hints of scenes to come--AT-AT's on a beach, up-armored Troopers, the focusing lens of the Death Star being lowered into place, a Grand Admiral walking through the remains of a battle field, and the final image of Jyn looking toward the camera in Imperial garb.  So much cool potential.  We'll see in December 2016!

Just for fun, here is a follow-up to the "Rogue One" trailer, featuring the voice actor of the Death Star Alarm.

The palette was: Titanium White, Naples Yellow (Red Lt.), Yellow Ochre, Burnt Umber, Cadmium Red Deep, Cobalt Blue (Hue), and Ivory Black.

This Mini-Paint was also completely out of control, and took about 3-1/2 hours to finish.  Sigh.

* * *


STEP ONE:  Here are the pencils on a 5-1/2" x 8" toned gesso piece of hardboard. 

* * *


STEP TWO:  This is the first pass, which took about an hour, just laying down the general colors and modelling of the figure.

* * *


STEP THREE:  The next hour, I was working on the face.  Sadly, I repainted it several times, only to wind up in the same general place each time by the end. 

* * *


STEP FOUR:  The last hour or so was spent finishing off the face, the uniform, and all the rest.  It is shocking how much of a difference a millimeter one way or another can make in trying to get a painting of a face to look right.  Of course, there are still a few spots which are on the other side of the millimeter in question, but it's all part of the learning process, don'cha know.  :-)

* * *

This was done with acrylic paint on 5.5" x 8" gessoed hardboard.

.

Thursday, April 14, 2016

Mini-Paint: Balok (Part 2)

Balok (Part 2)


For the final painting of this "Star Trek" run, I decided to follow up with the Commander Balok puppet from yesterday by doing a painting of the creepy-looking alien that controlled him, Clint Howard.

OK, here's the part where I admit that I did this painting/Blog post almost entirely for the sole reason of making that semi-obvious joke.  I'm sure you're asking yourself, "What sort of deranged maniac spends several hours doing a painting just so he can make one terrible joke?"  Well, you're looking at him!  Ugh, I think I need to start drinking some Tranya...

The palette was: Titanium White, Naples Yellow (Red Lt.), Yellow Ochre, Burnt Umber, Alizarin Crimson, Cobalt Blue (Hue), and Ivory Black.

This warm-up painting spun completely out of control, and took about 3-1/2 hours to finish.

Starting next week, probably something "Star Wars" related for my warm-up paintings.  Contrary to what this series may lead you to believe, I'm **FAR** more into "Star Wars" than "Star Trek".

* * *


STEP ONE:  Here are the pencils for Balok on a toned, 5.5" x 8" gessoed hardboard.

* * *


STEP TWO:  This is the first pass of the painting, laying out the general colors and modelling of the figure.  It took about an hour to get this far.

* * *


STEP THREE:  I spent the next two-and-a-half hours trying to get the colors mixed properly (or close enough to mixed properly), and just trying to get everything to look vaguely correct to the character.  It was a good exercise, both in color matching with such a limited palette, and in trying to vaguely do a portrait.  However, it completely blew my personal time limit for these warm-up paintings out of the water.  Oh, well.

* * *

This was done with acrylic paint on 5.5" x 8" gessoed hardboard.

.

Wednesday, April 13, 2016

Mini-Paint: Commander Balok

Commander Balok


This time around, it is Balok from the "Star Trek" episode, "The Corbomite Maneuver", featuring Commander Balok, who turned out to be an animatronic dummy (**SPOILERS**).  Oh, wait, I guess you should have written the Spoiler Warning before the reveal.  Let's try again: This classic episode featured the alien, Commander Balok, who turned out to be (**SPOILERS**) an animatronic dummy.  There, I fixed it.

The palette was: Titanium White, Naples Yellow (Red Lt.), Yellow Ochre, Burnt Umber, Alizarin Crimson, Cobalt Blue (Hue), and Ivory Black.

I actually got this one done within my former time limit, about 90 minutes!

* * *


STEP ONE:  Here are the pencils on a 5.5" x 8" gessoed hardboard.  Again, I used leftover acrylic from the previous painting to tone the hardboard.

* * *


STEP TWO:  The first half hour, I used a #10 flat brush to lay in the rough colors and form.

* * *


STEP THREE:  The last hour, I continued to build up the colors, highlights, and shadows, using a #10 flat brush and #10 round brush.

* * *

This was done with acrylic paint on 5.5" x 8" gessoed hardboard.

.

Tuesday, April 12, 2016

Mini-Paint: Evil Spock

Evil Spock


Continuing with the "Star Trek" theme, here's Evil Spock from the classic episode "Mirror, Mirror".  You can tell he's evil 'cuz he has a goatee.  That just science, people!

The palette this time was: Titanium White, Naples Yellow (Red Lt.), Yellow Ochre, Burnt Umber, Alizarin Crimson, Cobalt Blue (Hue), and Ivory Black.

This painting was about 2 hours.

* * *


STEP ONE:  Here is the quickly sketched out Evil Spock in pencil on a 5.5" x 8" gessoed hardboard.  I also had a little bit of left over paint, so I used it to tone the hardboard.

* * *


STEP TWO:  Here are the color breakdowns after the first half hour, using a #10 flat brush.  

* * *


STEP THREE:  After the next 45 minutes, I was mostly finished with the face using a #10 round brush.  

* * *


STEP FOUR:  The last 45 minutes was painting the hair, clothes, highlights and shadows, and other final touches.  Good enough to call it DONE!

* * *

This was done with acrylic paint on 5.5" x 8" gessoed hardboard.

.

Friday, April 8, 2016

Mini-Paint: Gorn

Gorn


Another Star Trek quickie painting.  This one is the Gorn, which Kirk fought on the classic episode, "Arena".  It's another one of those "When you think of 'Star Trek', you think of..." aliens.

The question for the painting was how much do I want to make the Gorn more "realistic", and how much should I keep it looking like a guy in a rubber suit.  I opted more toward the latter, just to keep it more in line with the flavor of the original "Star Trek" series.

There's also this AWESOME COMMERCIAL featuring a rematch of the Kirk vs Gorn fight.  It makes me laugh to myself every time.

I used the same palette as below: Titanium White, Ivory Black, Cadmium Yellow Medium, Naples Yellow (Red Lt.), Yellow Ochre, VanDyke Brown, Cadmium Red Deep, Permanent Blue Violet, and Ultramarine Blue.  I also used a #10 Flat Brush and a #10 Round Brush for all the painting.  And, once again, I decided to mix my own greens just for more of a challenge.

I ran a little over time with the painting, with this one also being 2 hours.  I suppose I should just move the time for my warm-up paintings from 60-90 minutes, to 90-120 minutes, since that is about how long they seem to be taking...  :-)

* * *


STEP ONE:  I quickly sketched out the Gorn painting on a 5.5" x 8" gray gessoed hardboard.

* * *


STEP TWO:  Using a #10 flat brush, I roughly laid in the colors.

* * *


STEP THREE:  Here's the next half-hour.  Still using the #10 flat brush, I tightened up the colors a bit and started working in some of the details of the Gorn.

* * *


STEP FOUR:  The last hour was used to add more shadows and highlights, and assorted details with a #10 round brush.

* * *

This was done with acrylic paint on 5.5" x 8" gessoed hardboard.

.

Tuesday, April 5, 2016

Mini-Paint: Orion Slave Girl

Orion Slave Girl


Hey, it's another "Star Trek" quickie painting.  I think I'm going to keep going with the Star Trek theme for the next few posts.  Just 'cuz it's there.  For this one, I chose the Orion Slave Girl.  After all, when you say "Star Trek", can "green-skinned, dancing alien women" be far behind?  I didn't think so!

Even though it is said of the Orion Slave Girl that "no Human male can resist them", I really don't think Kirk was trying all that much...

I used the same palette as below: Titanium White, Ivory Black, Cadmium Yellow Medium, Naples Yellow (Red Lt.), Yellow Ochre, VanDyke Brown, Cadmium Red Deep, Permanent Blue Violet, and Ultramarine Blue.  I also used a #10 Flat Brush and a #10 Round Brush for all the painting.

I decided to challenge myself a little more, by mixing the green from the Cadmium Yellow Medium, Yellow Ochre, and Ultramarine Blue, rather than using a pre-mixed green paint... which is why this quickie painting took even longer than my previous ones: 2-1/2 hours.  Sigh, this is quickly spiraling out of control from my self-imposed limit of 60-90 minutes.  Oh, well.

* * *


STEP ONE:  Here are the pencils, roughly scribbled out on a 5.5" x 8" gray gessoed hardboard.  

* * *


STEP TWO:  Here are the results after the first half-hour using the #10 Flat Brush, which is just the quick layout of color.

* * *


STEP THREE:  About a half-hour later, I was a little further along with a second pass over the under-painting, again using the #10 Flat Brush and #10 Round Brush.

* * *


STEP FOUR:  I spent yet another hour-and-a-half finishing up the painting.  A lot of extra time was spent trying to mix a proper green using yellows and blue, which can be fickle with the limited palette, above (although, I have done lots of paintings with an even more limited palette).  After 2-1/2 hours, I figured I had gone far enough with this one and called it done, lest I spend several more hours working on it!

* * *

This was done with acrylic paint on 5.5" x 8" gessoed hardbard.

.

Thursday, March 31, 2016

Mini-Paint: Talosian

Talosian


Here's another quickie acrylic painting.  This one ran a little longer than I intended--I planned on these being only 60-90 minutes, but this one went 2 hours.

In this case, it is the telepathic alien species, the Talosian, from "Star Trek" episode "The Cage/The Menagerie".  I'm sure enough of you are nerdy enough for me to not have to explain the long, storied history of that episode(s).  Anyhoo, when I saw this episode as a kid, I was captivated by the aliens and their telepathic powers.  Great episode!

I used the same palette as the C-3PO painting below: Titanium White, Ivory Black, Cadmium Yellow Medium, Naples Yellow (Red Lt.), Yellow Ochre, VanDyke Brown, Cadmium Red Deep, Permanent Blue Violet, and Ultramarine Blue.  I also used a #10 Flat Brush and a #10 Round Brush for all the painting.

Alas, the scanner really picked up on the texture of the gessoed hardboard.

* * *


STEP ONE:  I grabbed a 5.5" x 8" gessoed hardboard which had a neutral tone thrown over top and took a couple minutes to rough in the general layout with an ebony pencil.

* * *


STEP TWO:  I used a #10 Flat Brush to lay down the general shapes and colors for the first half-hour.

* * *


STEP THREE:  Over the course of the last 90 minutes, I tightened up the facial features, and pushed the shadows and highlights using both the #10 Flat Brush and the #10 Round Brush.

* * *

This was done with acrylic paint on 5.5" x 8" gessoed hardbard.

.

Tuesday, March 29, 2016

Mini-Paint: C-3PO

C-3PO


Well, I realized that I had been pretty lazy last year and really need to start working harder if I am going to get anywhere.  I thought I should set aside some time each week to do two or three short paintings--something in the range of 60-90 minutes or so at a maximum.  Just a warm-up of sorts, so nothing too fancy.  

Starting last week, I had set up a couple typical still life arrangements involving fruits and vegetables that were on the counter.  Y'know, the usual artsy-fartsy stuff, and they turned out well enough.

In this case, I wanted to work on painting something shiny and thought C-3PO would fit that bill just fine and--BONUS!--would also work as something I could post on this Blog without it lookin' out of place.  I grabbed a 5.5" x 8" piece of gessoed hardboard that I had randomly toned with some neutral colors.

For the palette: Titanium White, Ivory Black, Cadmium Yellow Medium, Naples Yellow (Red Lt.), Yellow Ochre, VanDyke Brown, Cadmium Red Deep, Permanent Blue Violet, and Ultramarine Blue.  I also used a #10 Flat Brush and a #10 Round Brush for all the painting.

I think it turned out well enough that I'm not totally embarrassed by the results.  I'm thinking I may post a series of other Sci-Fi/Horror/Comic Book oriented warm-ups in the future if there's enough interest.  We'll see, I guess.

And this time I had enough foresight to scan in my progress a little bit.  Yeah, I know, who'da thunk it?

* * *


STEP ONE:  First, I did a pencil layout with an ebony pencil I had laying around.  I will be the first to admit that they are a little off for the shape of the head, but I just wanted to get a rough placement of the figure and planned on fixing anything in the painting stages.  This was just a warm-up of sorts, after all.

* * *


STEP TWO:  I spent about 30 minutes using a #10 Flat brush to layout most of the form, lights and shadows, and the general color arrangement.  In some ways, I sort of like the flattened, posterized look and thought about stopping here.  It was done just enough that you can recognize who it is, but still abstract enough that it was visually interesting, IMHO.

* * *


STEP THREE:  I used the remaining hour I gave myself on this for tightening up the colors, adding more shadows and highlights, and a little bit more detail.  At the end of the 90 minutes, I pretty much called it done, signed my name on it, and scanned it in.  Good enough.

* * *

This was done with acrylic paint on 5.5" x 8" gessoed hardbard.

.

Monday, March 28, 2016

March M.O.D.O.K. Madness 2016 - Part 3

March M.O.D.O.K. Madness - 2016
Mental Organism Designed Only for Killing


It's yet another submission for March M.O.D.O.K. Madness Blog for 2016!

This time, it's a mash-up of that kid with an over-sized melon who already bears a slight resemblance to M.O.D.O.K., Charlie Brown.  If the mechano-chair fits...

* * *


PART ONE:  Here are the quick breakdowns, done with a .05mm mechanical pencil on 8-1/2" x 11" cardstock.  I then scanned it into Photoshop, which was a 1,000pt x 1,400pt document. 

* * *


PART TWO:  I did digital inks with a 9pt hard brush in Photoshop.  I thought I should move just a little bit off a straight Charlie Brown drawing and emphasize some of the brow to merge him more visually with M.O.D.O.K.

* * *


PART THREE:  The colors were done with a new MULTIPLY Layer, and then did the glowing effects with a new Layer and a 50pt air brush at 50% opacity.

* * *

Done with Photoshop.

.